Agenda
- Install IntelliJ
- Install Cursive plug-in
- IntelliJ basics
- Create a demo project with clojure and java module
- REPL
- Jar Clojure module
- Invoke and Debug clojure code in Java module
Install IntelliJ
You can download the IntelliJ here Cursive plug in will work with IntelliJ with version 12.1, 13.1, 14.1 and the 15 EAP. All the following examples will be using version 14.1 in Mac OS X
Install Cursive plug-in
Open “IntelliJ IDEA” –> “Preference” –> “Plugins” –> “Browse Repositories” –> “Manage Repositories”
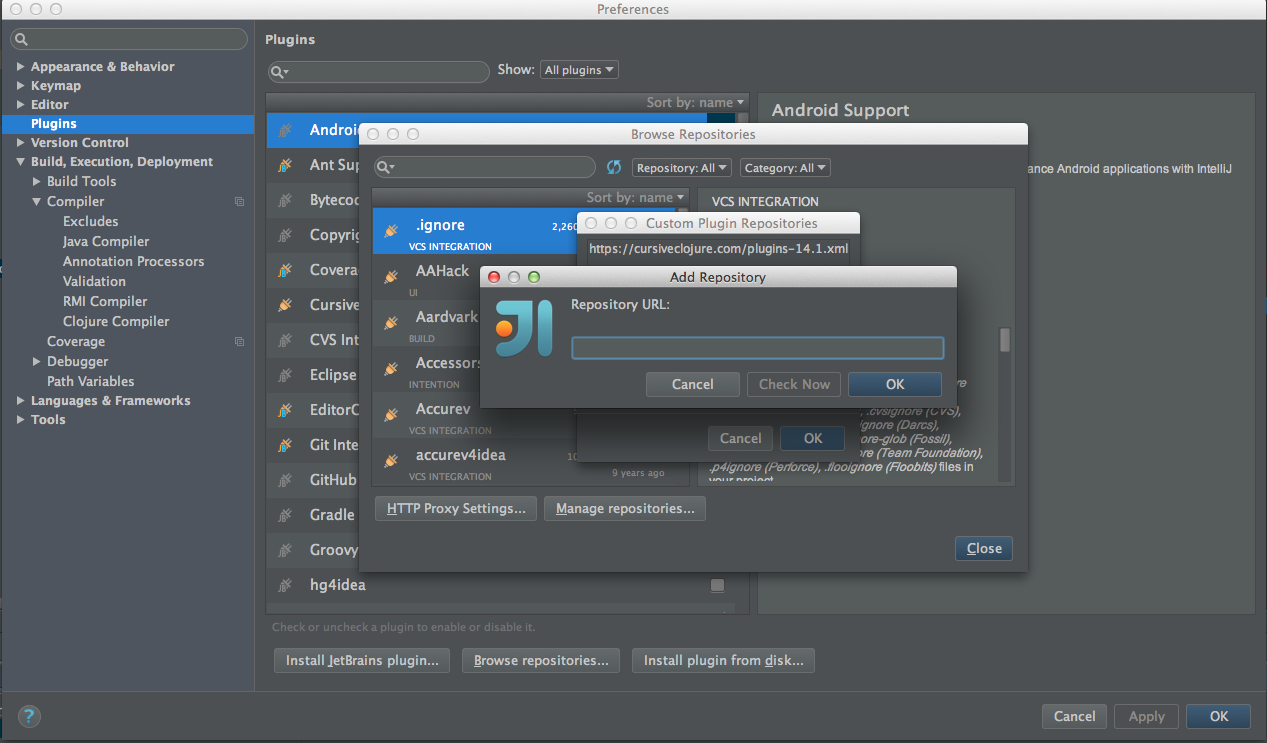
Add this repository url based on the IntelliJ version you are using. In this case it is https://cursiveclojure.com/plugins-14.1.xml
You can see other repository urls for different versions here
After that, you can see “cursive-**” in the list. Install it and restart the IntelliJ.
IntelliJ Baiscs
If you are coming from Eclipse, these tips may be helpful.
There is no “save” button in IntelliJ. You can check all your changes from the “Local History”. It is like a VCS but it is only for personal use. To see your history changes, you can do shortcut “cmd + shift + a” to bring up the action window. And type in “local history”, press enter.
There is no “workspace” in IntelliJ. What is called “project” in IntelliJ is like “workspace” in the Eclipse. “project” in Eclipse is like “module” in IntelliJ.
IntelliJ is not compiling your codes automatically. Unlike Eclipse, which do an auto-compilation when you push the save button. Since there is no “save” in IntelliJ, there won’t be auto-compilation. Normally it will compile for you when you invoke “make”, which happens before you run a test by default. Don’t worry about that too much at this moment, you will get used to it pretty soon.
Change your dependencies in “Module Setting”. Like setting the class path and lib in the Eclipse, dependencies settings are located at “Module Setting”(right click on the module)
Create a Demo Project with Clojure and Java Module
I will create a project mixed by clojure module and java module. And I will show you how to do REPL and debug in the next two sections using this project.
“IntelliJ IDEA”–>“File”–>“New”–>“Project” Then select Empty Project.
Type in project name and location. And finish.
Create a new clojure module within the project you just created. Choose type Leiningen on the left. Next. Click “Use snapshots”. Finish. I name it “clojuredemo”
Leiningen is a management tool for clojure project/module.
- Create a new clojure namespace named “core” in clojuredemo module under src dir.
1 2 3 4 5 | |
Create a new java module in the same project. I name it “java-demo”. Include “Clojure(1.7.0)” in the “Additional Libraries and Frameworks”.
Create a new java class named “DemoJava” in the java-demo module under src dir.
If everything goes right, you should see something like this:

REPL
For more information about REPL, please see this page.
Right click the clojuredemo module and create a REPL for the current module. And select “Run nREPL with Leiningen”. OK.
Run REPL. You should see a REPL window prompts to you.
1 2 3 4 5 | |
As you can see, you can load the file to the REPL or you can switch REPL NS to current file. Let’s do switch REPL NS to current file.

Then you can type in (foo "UC") in the cmd line. The result UC Hello, World! will be shown in the REPL window.
You can also do a short cut “cmd + shift + p” to execute individual forms.
Jar Clojure module
If you create your clojure module using Leiningen, then you should see a project.clj file in the dir.
You should see something like this:
1 2 3 4 5 6 7 | |
Adding these two line after the “:dependencies…”
1 2 | |
Open the terminal. cd to the clojuredemo dir. And execute this:
1
| |
If everything goes right, you can see the “clojuredemo.jar” in the /target folder.
Invoke and Debug clojure code in Java module
In the java-demo module, add Jar dependency for clojuredemo.jar. And change your DemoJava.java file to this:
1 2 3 4 5 6 7 8 9 10 11 12 13 14 15 16 17 18 19 20 | |
Remember to include “Leiningen: org.clojure/clojure:1.7.0” in the dependency.
Then you can run the DemoJava in IntelliJ. You should see UC Hello, World! in the console.
Now let’s do debug.
Set a break point at the line demo.invokeMethod(). And run the debug. Try out step in and step out yourself, just like what you do in the Eclipse.
I am sure you will be amazed by it allows you step from java code to clojure code!

